Running the Pipeline
The RECOVAR pipeline takes particle images and a mask, then computes the mean reconstruction, covariance, principal components, and embeddings.
Instructions below are tabbed for the CLI and the GUI. How to launch the GUI →
Submitting a pipeline job

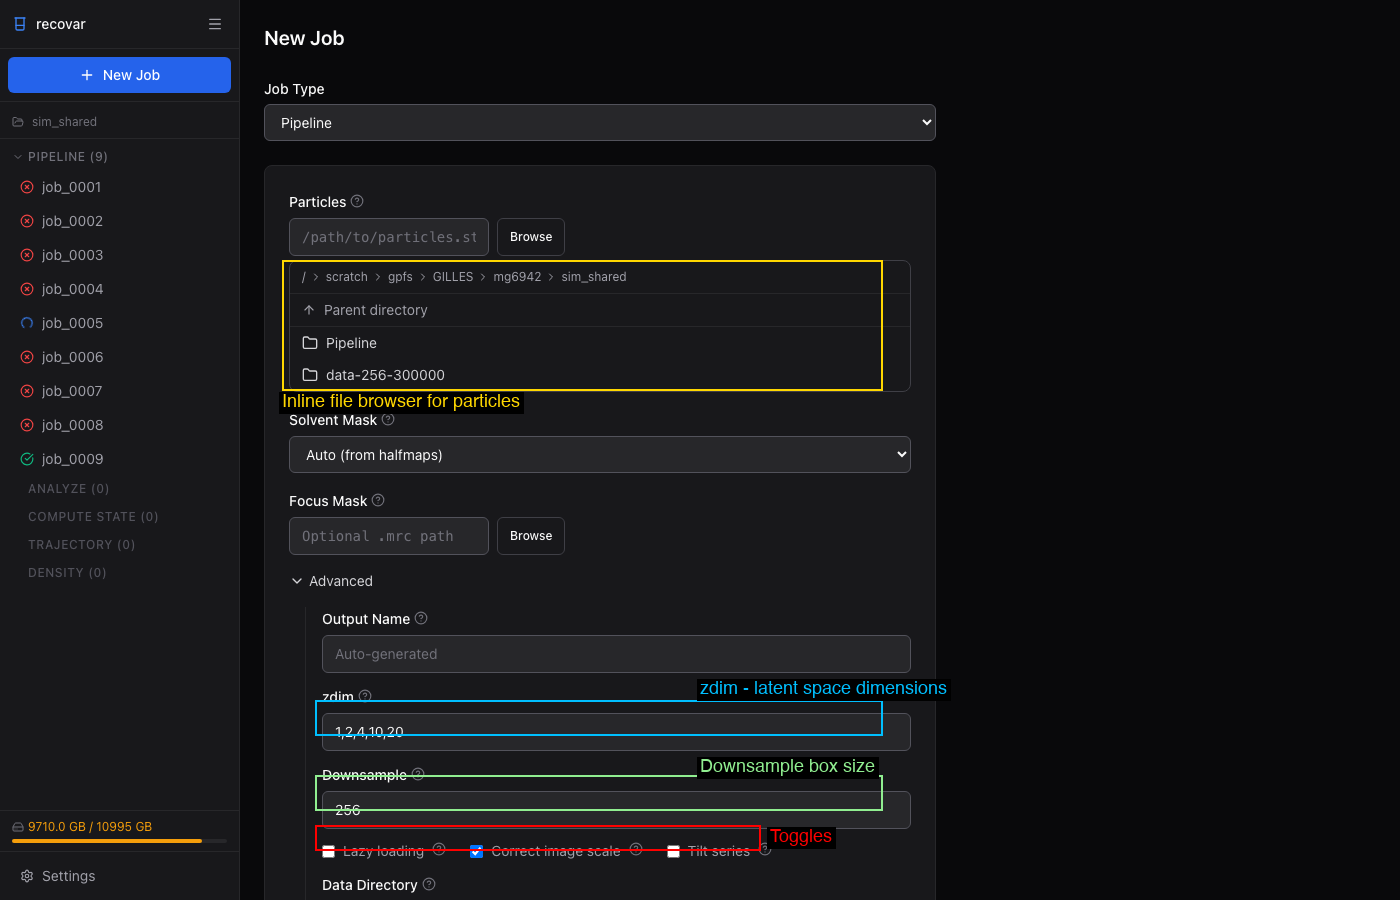
- Click + New Job in the sidebar
- Select Pipeline from the Job Type dropdown
- Browse to your particles file (
.star,.cs, or.mrcs) - Choose a solvent mask (Auto, Sphere, None, or custom
.mrc) - Choose SLURM Cluster or Local GPU under "Run on"
- Click Submit Pipeline Job
# Recommended: run inside a project
recovar init_project my_project
cd my_project
recovar pipeline particles.star --mask mask.mrc --project .

# cryoSPARC cs file
recovar pipeline particles.cs --mask mask.mrc --datadir /project/ --project .

# The pipeline downsamples to a box size of 256 by default.
# Pick a different target box size (e.g. 128 for faster runs):
recovar pipeline particles.star --mask mask.mrc --downsample 128 --project .

# Or keep the original box size (disable the default downsampling):
recovar pipeline particles.star --mask mask.mrc --no-downsample --project .

# Standalone explicit output directory (still supported)
recovar pipeline particles.star -o output --mask mask.mrc

# Legacy pickle files
recovar pipeline particles.128.mrcs -o output \
    --poses poses.pkl --ctf ctf.pkl --mask mask.mrc
Required arguments
| Argument | Description |
|---|---|
particles |
Input particles (.star, .cs, .mrcs, or .txt) |
-o, --outdir |
Output directory (optional in project mode) |
--mask |
Solvent mask (.mrc), or from_halfmaps, sphere, none |
Common options
Focus Mask is a top-level field (just below Solvent Mask) — browse to a custom focus mask for targeted heterogeneity, or leave it empty.
Expand the Advanced section in the job form to set:
- Output Name -- name for the job directory (auto-generated if blank)
- zdim -- PCA dimensions (default: 1,2,4,10,20)
- Downsample -- target box size (default: 256)
- Lazy loading -- stream images from disk for large datasets
- Correct image scale -- estimate and correct amplitude scaling
- Do-over with contrast -- recompute after the scale correction (appears only when Correct image scale is on)
- Tilt series -- enable for cryo-ET data (reveals the cryo-ET panel below)
- Data Directory and Strip Prefix -- path overrides for resolving image filenames
Under Rarely Used: Halfset indices (.pkl), N Images, Poses, CTF, and Indices (--ind).
GUI defaults differ slightly from the CLI
The GUI turns Correct image scale and Lazy loading on by default, whereas the CLI leaves both off. Uncheck them to match the CLI behavior.
| Flag | Default | Description |
|---|---|---|
--downsample D |
256 | Downsample images to box size D before processing (pre-downsamples to disk). Skipped automatically if images are already at or below this size |
--no-downsample |
— | Disable the default downsampling and run at the original box size |
--poses |
Auto | Poses file (.pkl). Auto-extracted from .star/.cs |
--ctf |
Auto | CTF file (.pkl). Auto-extracted from .star/.cs |
--focus-mask |
None | Focus mask for targeted heterogeneity |
--mask-dilate-iter |
0 | Dilate the mask by this many iterations |
--zdim |
1,2,4,10,20 | PCA dimensions for embedding |
--only-mean |
False | Only compute the mean (fast, for verifying setup) |
--correct-contrast |
False | Estimate and correct amplitude scaling |
--lazy |
False | Lazy loading for large datasets |
--multi-gpu |
False | Multi-GPU parallelization (experimental) |
Execution settings
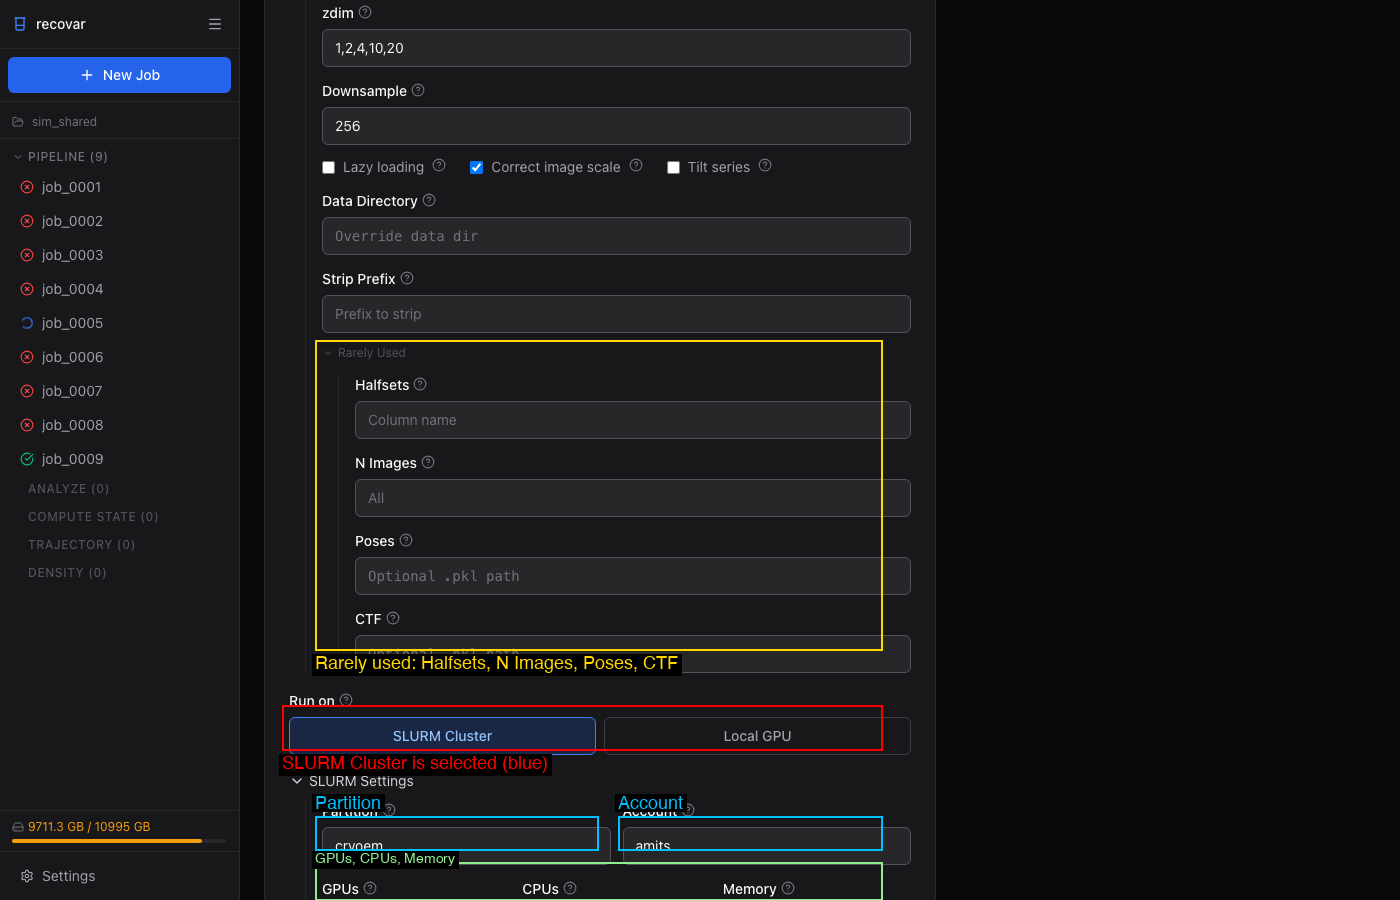
When submitting to SLURM (either from the GUI or CLI on a cluster), configure:
- Partition and Account — your cluster allocation
- GPUs, CPUs, Memory, Time limit
These can be saved as defaults in Settings (gear icon in sidebar) so you don't have to fill them in every time.
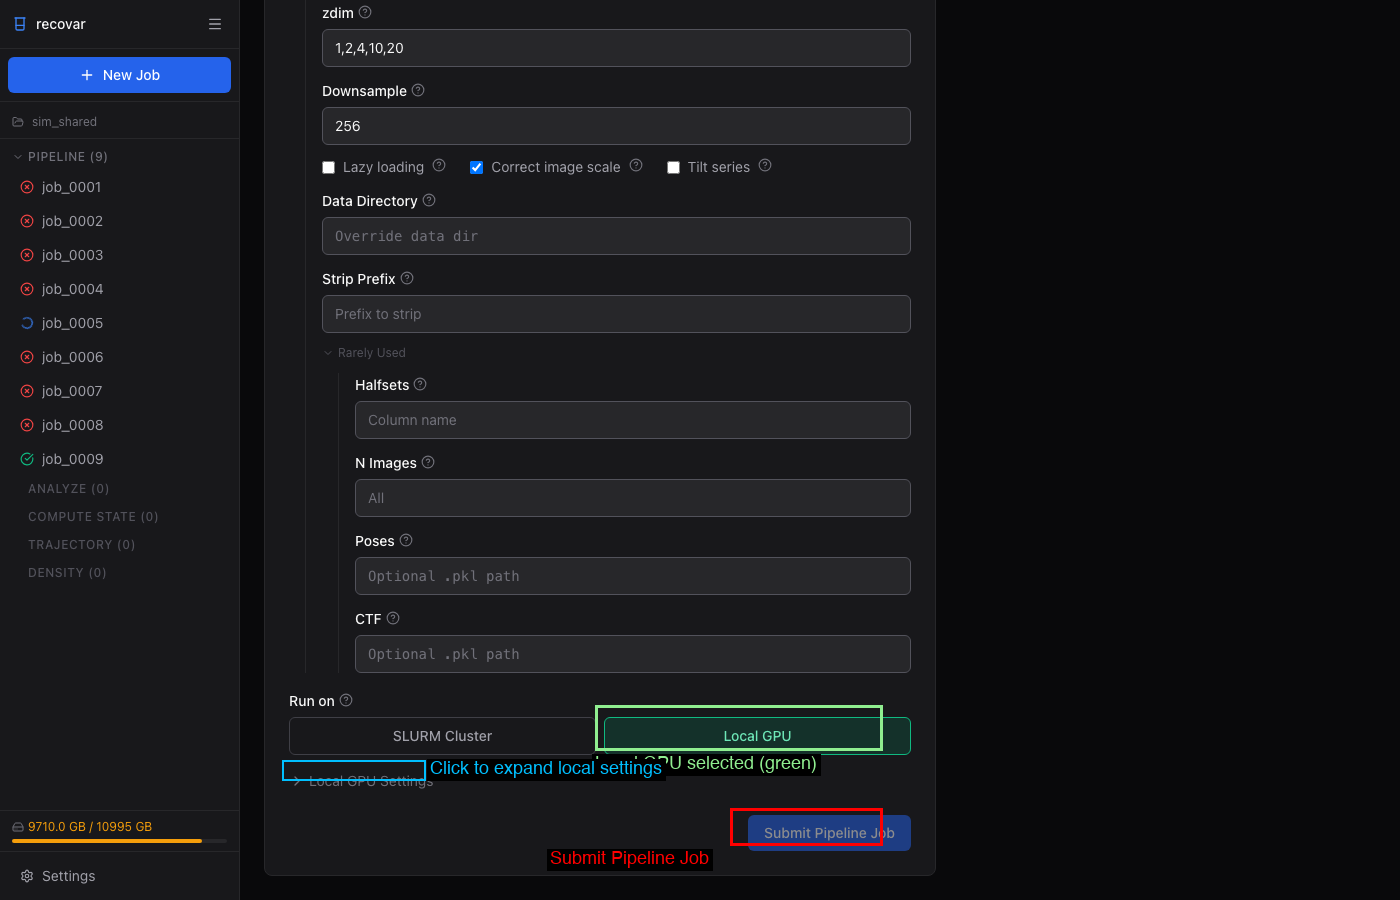
Run directly on the current machine's GPUs without SLURM:
- GPU picker — select specific GPUs or use all
- Setup command — e.g.,
module load cudatoolkit/12.8 - Environment variables — extra env vars for the job
Dataset loading options
| Flag | Default | Description |
|---|---|---|
--datadir |
None | Path prefix for resolving relative image paths |
--strip-prefix |
None | Strip prefix from image paths |
--ind |
None | Filter to specific image indices (.pkl) |
--particle-ind |
None | Filter particles by indices (cryo-ET only, .pkl) |
--n-images |
All | Number of images to use |
--halfsets |
None | Pre-computed half-set split (.pkl) |
--padding |
0 | Real-space padding |
--uninvert-data |
automatic | Data sign inversion: true, false, or automatic |
Advanced options
| Flag | Default | Description |
|---|---|---|
--noise-model |
radial | Noise model: radial or white |
--mean-fn |
triangular | Mean function: triangular or triangular_reg |
--gpu-budget-gb |
All | Soft GPU memory budget in GB for RECOVAR batch planning |
--n-gpus |
All | Number of GPUs to use |
--keep-intermediate |
False | Save intermediate results |
--accept-cpu |
False | Allow running without GPU |
--ignore-zero-frequency |
False | Useful if images are normalized to zero mean |
--low-memory-option |
False | Lower memory for covariance estimation |
--very-low-memory-option |
False | Lowest memory for covariance estimation |
Multi-GPU (experimental)
Multi-GPU parallelizes the covariance estimation step across GPUs. Because that is the most expensive step, multi-GPU reduces runtime on large datasets.
# Use all available GPUs
recovar pipeline particles.star -o output --mask mask.mrc --multi-gpu

# Use specific number of GPUs
recovar pipeline particles.star -o output --mask mask.mrc --multi-gpu --n-gpus 4
Work in progress
Multi-GPU is experimental. It parallelizes covariance estimation only — the mean reconstruction and embedding steps still run on a single GPU. If you run into issues, drop --multi-gpu and the pipeline will run normally on one GPU.
GPU memory and device selection
# Plan for a smaller per-GPU budget (useful on shared machines)
recovar pipeline particles.star -o output --mask mask.mrc --gpu-budget-gb 8

# Select specific GPUs by ID
CUDA_VISIBLE_DEVICES=0,2 recovar pipeline particles.star -o output --mask mask.mrc --multi-gpu

# Disable JAX memory preallocation (useful on shared machines)
XLA_PYTHON_CLIENT_PREALLOCATE=false recovar pipeline ...
Cryo-ET options
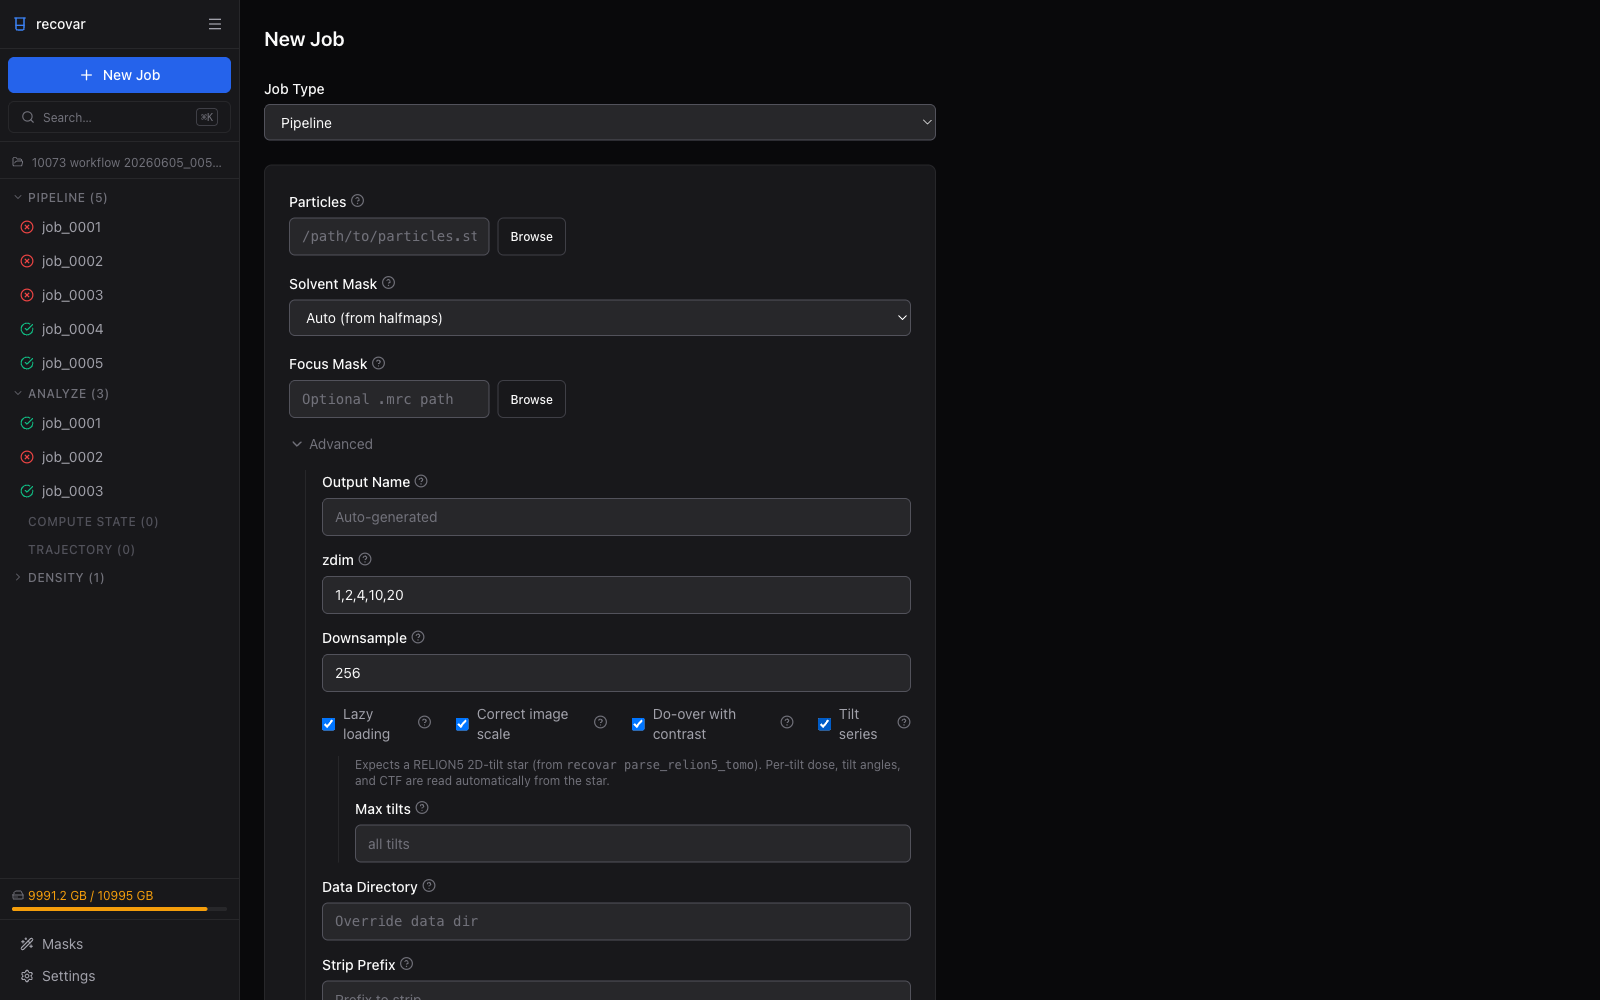
Tick Tilt series in the Advanced section to switch the pipeline into cryo-ET mode. This reveals a cryo-ET panel, which expects a RELION5 2D-tilt star file (produced by recovar parse_relion5_tomo) — per-tilt dose, tilt angles, and CTF are read automatically from that star. The one common override exposed here is Max tilts (--ntilts), which limits how many tilts per series are used.
| Flag | Default | Description |
|---|---|---|
--tilt-series |
False | Use tilt-series data |
--tilt-series-ctf |
Auto | CTF model: cryoem, relion5, warp |
--dose-per-tilt |
From file | Dose per tilt |
--angle-per-tilt |
From file | Angle per tilt |
--ntilts |
All | Number of tilts per series |
--premultiplied-ctf |
False | Input images have pre-multiplied CTF |
See Cryo-ET for details.
Output structure
output/
  job.json                 # Job metadata (version, timing, parameters)
  command.txt              # Command that was run
  run.log                  # Full log
  README.txt               # Human-readable output summary
  downsampled/             # Pre-downsampled images (created unless --no-downsample)
    particles.256.mrcs
    particles.256.star
  model/                   # Internal model data
    params.pkl             # Pipeline parameters
    zdim_4/                # Per-zdim embedding directories
      latent_coords.npy    # Latent coordinates for zdim=4
    zdim_10/
      latent_coords.npy
    ...
  output/
    volumes/
      mean.mrc             # Mean reconstruction
      mean_filt.mrc        # Filtered mean
      mean_half1_unfil.mrc # Unfiltered half-map 1
      mean_half2_unfil.mrc # Unfiltered half-map 2
      mask.mrc             # Solvent mask used
      dilated_mask.mrc     # Dilated mask
    plots/                 # Diagnostic plots
  analysis_*/              # Results per zdim (after running analyze)
When using the project system (--project), pipeline output is placed into auto-numbered directories like Pipeline/job_0001/. The numbered directories stay stable on disk, while RECOVAR records human-readable job names in project metadata for the CLI and GUI.
Viewing results
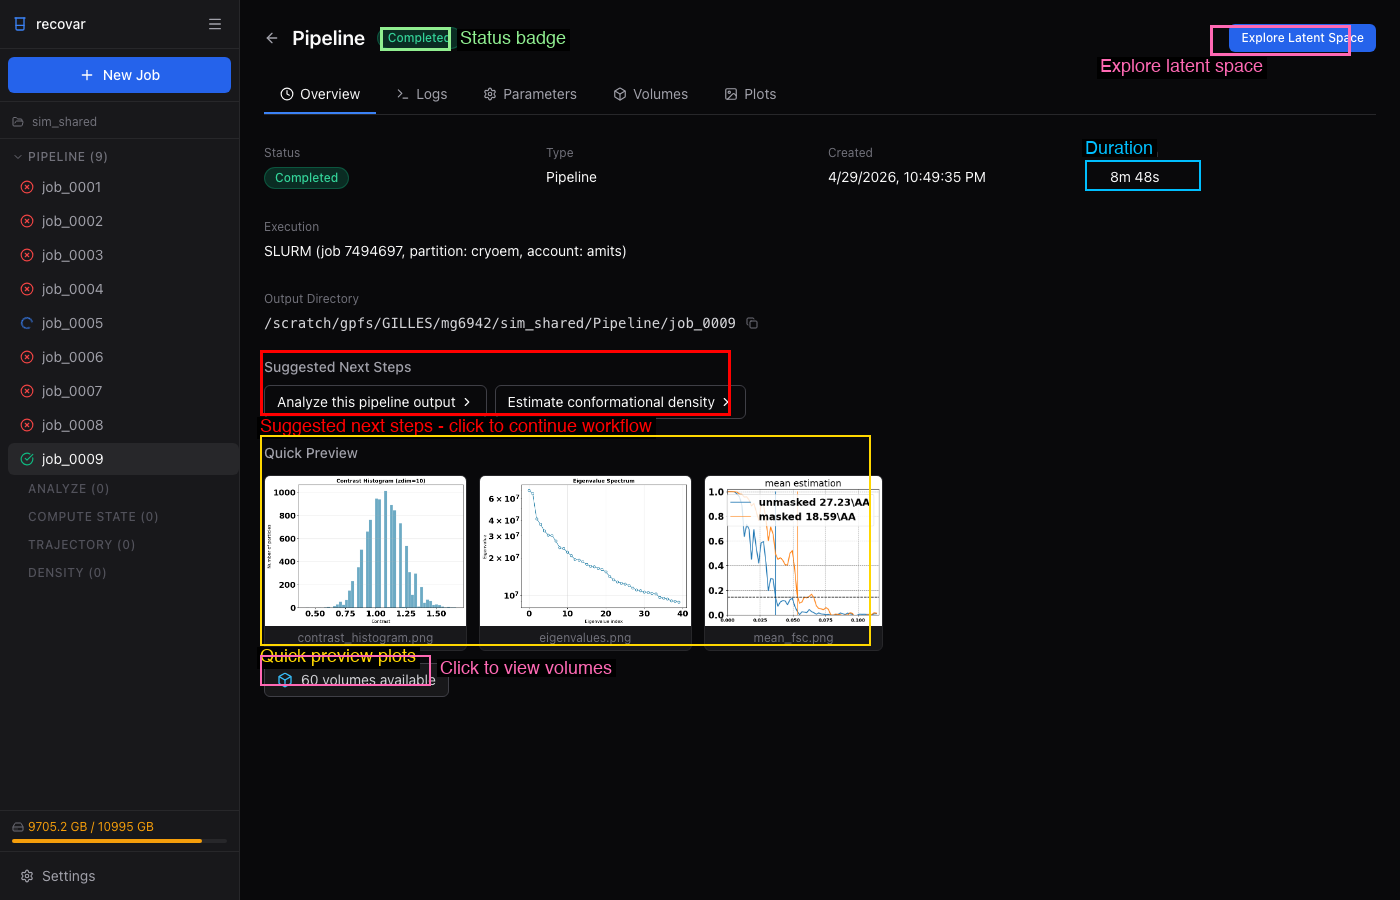
After the pipeline completes, the job detail page shows:
- Quick Preview -- contrast histogram, eigenvalue spectrum, mean FSC
- Volumes tab -- browse all output volumes (mean, eigenvolumes, variance maps)
- Plots tab -- all diagnostic plots
- Suggested Next Steps -- one-click links to run Analyze or Density Estimation
The pipeline writes diagnostic plots and volumes under the output directory — see the output/plots/ and output/volumes/ subfolders above. Open the .mrc volumes in ChimeraX and the .png plots in any image viewer.
Tips
- Downsample: 256 by default; drop to 128 for faster runs, or
--no-downsampleto keep the original box size. - zdim: the default
1,2,4,10,20is usually enough; for publication you can also try--zdim 40. - n-images: 10000-50000 for initial exploration, all images for the final run.
- --correct-contrast: enable unless the data is already contrast-corrected.
- Quick check:
--only-meancomputes only the mean reconstruction — a fast way to verify data, mask, and CTF before a full run. - Large datasets (>500k particles):
--lazyplus--downsample 128. - Out of GPU memory:
--low-memory-optionor--very-low-memory-option, or set--gpu-budget-gb 8.